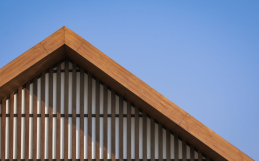
Adding a skylight to your home can be a game-changer, bringing in more natural light and making any space feel more open and inviting. But if you’re thinking about skylight installation, especially on an existing roof, you need to know exactly what you’re doing. This guide will walk you through how to install a skylight on an existing roof while following local building codes and best practices.
Cutting into your roof without the right knowledge or tools can lead to leaks, structural issues, and costly repairs. Plus, there are different types of skylights, including deck mount skylights and curb mount skylights, each suited for different roof types. Whether you have a flat roof or a sloped one, understanding the right way to install skylights will save you from future headaches.
If you’re unsure about the process, Warner Roofing & Construction has the experience to add skylights properly and ensure your roof remains secure.
How to Install a Skylight on an Existing Roof
Before you start cutting into your roof, it’s important to plan everything carefully. Skylight installation is not just about creating a hole and placing a window—it requires precision, proper sealing, and compliance with local building codes to prevent leaks and maintain your home’s structural integrity.
Tools You’ll Need
Before starting, gather the necessary tools to install the skylight properly:
- Tape measure
- Chalk line
- Circular saw or reciprocating saw
- Utility knife
- Hammer and nails
- Drill and screws
- Flashing kit (specific to your skylight type)
- Roofing cement
- Waterproof underlayment
- Safety gear (goggles, gloves, harness)
Planning the Skylight Installation
Selecting the right skylight for your roof is crucial for ensuring proper installation, durability, and efficiency. Skylights come in different styles, but the two most common types are deck mount and curb mount skylights. The right choice depends on the structure of your existing roof.
Deck mount skylights are ideal for sloped roofs. These skylights are installed directly onto the roof decking, creating a low-profile, flush appearance. Because they integrate smoothly with the roofing materials, they provide a streamlined look and improved energy efficiency.
Curb mount skylights, on the other hand, are better suited for flat roofs. Unlike deck mount options, curb mount skylights require a raised frame, or curb, to be built onto the roof before installation. This added structure helps prevent water from pooling around the skylight, reducing the risk of leaks.
Pick the Location
Choosing the right location for your skylight is just as important as selecting the type. Placement affects how much natural light enters your home and how well the skylight integrates with your existing roof structure.
To maximize sunlight exposure, position the skylight in a spot that gets consistent daylight without being obstructed by trees, chimneys, or other structural elements. Be mindful of major structural components, such as load-bearing beams, that could interfere with the installation process.
It’s also crucial to avoid placing a skylight near plumbing vents, electrical wiring, or HVAC components. Cutting into these systems can lead to expensive repairs and potential safety hazards. Always inspect the area carefully before making any modifications to your roof.
Check Local Building Codes
Before installing a skylight, make sure you are complying with local building codes. These regulations outline important requirements related to load-bearing capabilities, waterproofing, and proper sealing methods. Failing to follow these codes can result in structural damage, fines, or issues when selling your home in the future.
Many municipalities have specific rules regarding the placement and installation of skylights, especially when it comes to waterproofing and insulation. Checking with your local building department or consulting a professional roofing contractor like Warner Roofing & Construction can ensure your skylight is installed safely and legally.
 Cutting and Installing the Skylight
Now it’s time to get to work! You’ll want to mark the areas, make the cuts (while being mindful of hidden obstacles like electrical wiring or ventilation ducts), and have at it! And remember: Safety is job number one.
Mark the Opening
- Use a chalk line and tape measure to outline the portion of the roof to be cut.
- Double-check your measurements to avoid mistakes.
Cut the Roof Opening:
- Use a circular saw or reciprocating saw to carefully cut along the marked lines.
- Remove shingles and excess materials while keeping the surrounding area intact.
Install the Skylight Frame:
- Fit the frame into the opening and secure it with screws or nails.
- Add waterproof underlayment around the edges to prevent leaks.
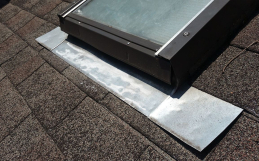
Secure the Skylight and Flashing:
- Place the skylight into the frame and follow the manufacturer’s instructions.
- Install flashing around the edges to prevent water from seeping in.
Testing the Skylight Installation
The job is done and, hopefully, looks great! All of the natural light will be flooding in–but you’re not done yet.
- Check for leaks: Use a hose to spray water around the skylight and see if there are any gaps.
- Inspect the interior: Look for any water stains or drafts inside your home.
- Ensure proper sealing: If any areas seem vulnerable, apply additional roofing cement or caulk.
Make Sure You Do It Right
Skylight installation may seem simple, but it’s easy to make costly mistakes. Cutting a hole in your roof is a big deal, and if not done correctly, it can lead to serious problems for your home.
- Leaks and Water Damage: Poor sealing or improper flashing can cause leaks, leading to mold, rot, and water damage inside your home.
- Structural Issues: Cutting into load-bearing portions of the roof can weaken the structure, causing sagging or collapse over time.
- Energy Efficiency Problems: A poorly installed skylight can let in drafts, increasing heating and cooling costs.
- Code Violations: If your skylight isn’t installed following local building codes, you might have issues with permits or future home sales.
If you’re not confident in your ability to install a skylight correctly, hiring a professional roofing contractor like Warner Roofing & Construction is the best option. Our team ensures that every skylight installation meets safety, efficiency, and durability standards so you don’t have to worry about future problems.
The Benefits of a Skylight
Installing a skylight isn’t just about aesthetics—it brings several benefits to your home:
- Increased Natural Light: A skylight brightens up dark areas and makes any space feel larger.
- Energy Savings: Reducing the need for artificial lighting lowers electricity bills.
- Better Ventilation: Some skylights open to let in fresh air, improving indoor air quality.
- Boosts Home Value: A well-placed skylight can enhance the appeal of your home, making it more attractive to buyers.
- Health Benefits: Natural light helps regulate sleep patterns and improves overall well-being.
How to Install Skylight on Existing Roof FAQs
- What type of skylight is best for my roof?
It depends on your roof type. Deck mount skylights are great for sloped roofs, while curb mount skylights work better for flat roofs.
- How long does it take to install a skylight?
A professional installation typically takes one to two days, depending on the complexity of the project.
- Will a skylight make my home hotter in the summer?
High-quality skylights with UV protection and proper ventilation features help regulate indoor temperature.
- Can I install a skylight myself?
While it’s possible, skylight installation requires precise cutting, waterproofing, and knowledge of local building codes. Hiring a professional ensures the job is done correctly.
- What maintenance does a skylight need?
Regular cleaning, checking seals for leaks, and ensuring flashing remains intact will keep your skylight in good condition for years.
Call Warner Roofing & Construction Today!
If you’re ready to add skylights to your home, and you’re not sure you can pull it off, let Warner Roofing and Construction handle the job. Our expert team ensures a flawless installation that follows all local building codes, prevents leaks, and enhances your home’s beauty. Contact us today to schedule your skylight installation!